Monday, February 27, 2006

Brent Standing Up with Support


Finally, my baby can now stand up and all the support he needs is just by holding on to our hands ... aside from that ... it's all him ... and he's attempting to take steps as well ... so cutie!!!! =)

Here's a picture ...

Such a proud Mommy ...

Thursday, February 23, 2006

Doorknob Accessories

I found something on the net and it's really cute ... another thing I can add to my to-do list ... wonder when I will be able to finish even one? So hard to be a working mom ... for those who do have the time ... enjoy ...

Door Knob Accessories
Supplies:
  • Wooden door hanger or two pieces of chipboard and the template available here.
  • Mod Podge or other decoupage medium
  • Patterned paper
  • Scrapbooking embellishments
  • Acrylic paint
  • Sand paper
  • Corner rounder
  • Diamond Glaze or other strong adhesive
Pre-made Wooden Door Hanger:
  • You can purchase a pre-made wooden door hanger at most large craft stores.
  • Remove all stickers from the door hanger and lightly sand the surfaces.
Chipboard Door Hanger:
  • Download and print the template from the link above.
  • Cut the template out, including the center circle.
  • Trace the shape onto two pieces of chipboard and cut out.
  • Glue the two pieces of chipboard together, and allow to dry thoroughly.
Steps
  1. Paint a base coat color on the hanger, paying close attention to all edges. Allow to dry.

  2. Measure the width and length of your door hanger, and subtract a 1/4 of an inch from each measurement. Using those measurements, cut two of the template from patterned paper, to cover the front and back. Be sure to cut out the hole on each piece, as well.

  3. Apply a thin layer of Mod Podge and adhere the paper to the hanger. Allow to dry completely.
  4. As each layer dries, add an additional layer of paper, as desired, using a thin coat of Mod Podge, and allow to dry.

  5. Once all paper layers are dry, embellish with stickers and rub-ons as desired.

  6. Seal the entire project with two thin coats of Mod Podge. Allow the first coat to dry before adding the second. Allow to dry before continuing.

  7. Add ribbons, fibers and three-dimensional embellishments with Diamond Glaze.

  8. Allow entire project to dry overnight before hanging on your doorknob.

Wednesday, February 22, 2006

craft mess

For today, here's what I have. I've taken pictures of my scrapbooking stuff and I realized that it's messed up. I need to organize everything.

Sheesh. And I thought I was organized. LoL!

Tuesday, February 21, 2006

Kikay Kit

For today, here's my show and tell ... looking at the pictures, you'd be able to surmise that I am so into accessories. It's only now that I have a baby that I am able to stop myself from buying everything on sight. =p

Monday, February 20, 2006

scrap stuff

And so, the weekend has gone by and what have I set for myself to accomplish?

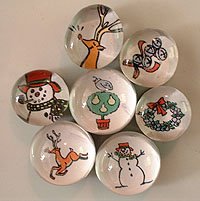
- a puzzle magnet
- a marble magnet
- start Brent's scrapbook
- finish my scrapbook

And what have I finished? Nothing ... well, does buying the scrapbook for Brent and it still being in the plastic count as something? =p

But I was able to get images fo my scrapbook and here are some samples. To see more, click here.

magnets


Eeekkkk!!!! One of our bosses here at work just got back fromt he states and brought me 4 magnets ... 1 from Kentucky, 1 from California, 1 from Hollywood, and 1 from Florida!

Eeekkkk!!!! I am so happy ... I'll post pictures tomorrow. =)

*huge grin on my face*

** update: Here's the picture. =p

B at 7 months


This is Brent at 7 months. Still a happy baby though he squels now which is cute at first but tends to numb your ears coz his voice is so LOUD.

Really.

He's still a cuddly mini bear and is the sweetest angel. Loves to kiss people and is starting to do the whole close-open thing with his palm.

God ... I love this baby.

To see more of my baby at 7 months ...

Friday, February 17, 2006

scrap stuff # 2

This is my very first venture into scrapbook and it was all about me. Funny though coz I read somewhere that most people who do scrapbooks don't do one for themselves. I, on the other hand, made it all about me; my family, friends, and what have you.

Here are a few samples and for further pictures, go here.


^ This one above is the cover of my scrapbook and as you can see, I was very vain. Still am. LoL!


This is one of the pages inside the scrapbook. This model thing was given to me by a cowork shopper when I dabbled into theater plays. Name was Michael but I don't know where he is now. But, thanks and I really loved it.

Thursday, February 16, 2006

Valentine's Gifts

I found these wonderful heartshaped stuff at our local book sotre and embellished it with a few things. Here's what it turned out to be. Gave the MAMA one to my mother in law and the flowery one wiht a bear to my sister in law. =)


And below is a picture of my of my dinner last night when my husband took me out for a date. Yummy food. You guys should try it for those who know of Chef D'Angelo. Good price, great recipe. Yum yum! =)


It's called seafood medley pasta and boy was it really good! Here's the recipe for those who want to try it out.

Wednesday, February 15, 2006

Marble Magnets

So I now have a new project lined up amongst all the others that I shall be making ... too many things to do and so lil time ...

This is from not martha.

How to ...

Gathering the stuff - silicon glue, cut out pictures, magnets, and marbles. I put paper down so I wouldn't ruin my cheap Ikea coffee table. Ok, at this point I have to admit my initial failing. I, of course, didn't check to see what type of glue would be best before I went to the store so I got Crafter's Goop first. I'm sure it works really really well, but man does it smell strongly! It's been three days since my first try and it's still at the stage where you sniff it once, but not again because you know it can't be good for your lungs. I went back, and on advice from the Paper Candy instructions, found silicon glue. It doesn't have a strong odor and seems to just work just right.


note: I forgot a step. A few people suggest gluing down a white round of cardstock first (junk mail comes in great here) as the glue can seep through your picture and show the dark magnet underneath if you don't. It didn't seem to affect my magnets, I used magazine pictures which are fairly flimsy, however I will have to test it to see if my whites could be whiter.

I used a toothpick to spread a thin layer of the glue on the magnet, and put the picture down over that. I had a few seconds to slide the picture into place if needed. I used a toothpick because really strong glue in squeezey metal containers hates me and gloops everywhere. I squeezed a tiny amount of the silicon glue onto some paper and used the toothpick from there. No traumatic events occurred and I don't need to go back to Ikea to replace the table.

Using the toothpick again, I dabbed a bit of glue, about the size of a lentil, onto the middle of the picture.

Lower the marble straight down onto the glue.
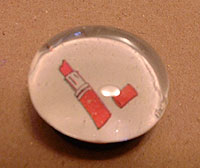
And press down in the center. You can see the glue spreading out to the corners making a nice seamless, hopefully bubble less, magnet. Any of those ripples on the bottom of the marble will magically disappear. This whole thing is very satisfying.

Hope I will be able to make some for myself and for friends. =p

Tuesday, February 14, 2006

1999 Calendar


My mother in law gave this to me and I must say, this is so beautiful. I can imagine it when its framed, it will definitely be a classic.

Sigh ...

cross stitch projects

I've learned to cross stitch because of my Mom. She gave me a kit as a birthday gift and I had to learn it so that her gift will not go to waste. I am now forever grateful to her for this talent I have discovered.

Here are some of the stuff I've finished over the years (mind you, I started stitching in 1995) ..


This, I believe was the first big one I finished. It was all because of the blue eyes. Gotta love eyes like that even in a cat ... its a siamese cat bdw.

It wasn't so hard to finsih as well except for the face part which made me swear a lot. =p

And because of this, I promised myself that one day, I will have a cat just like this. I.want.it.


This one was quite easy to make .. .took me a week if I remember it correctly. Made this for my twin brothers. It's still hanging in their room up to now eventhough they are no longer kids and are actually capable of making one of their own (God forbid!)


This one, the Madonna and Child was made for my Mom. She's turned into another religion now but she still keeps it which makes me very happy.

an angel for an angel


I made this one for 1 month and a half every single day. I swear. I was pregnant and bored out of my wits since hubby was off to work and I was stuck at home.

This is for my baby and it hangs in our room as a constant reminder of the wonderful blessing that we have received from up above.

Our own cherub, our son.

Monday, February 13, 2006

B with Maternal Grandparents

So, we spent the day wiht MY family and it was so nice. Good food, continuous conversation ... lovely day .... =p Am. So. Happy.

My Dad held Brent for the first time and it made me feel so happy. B was so behaved (thank God!) and just kept pplaying and making wailing sounds. They just loved him to bits and pieces.

I'm just so grateful for these moments coz there was a time I thought it would never happen.

Thank you God, for another chance.

Friday, February 10, 2006

framed heart


Awww .. .the stuff I see on the net ... makes me just wanna stay at home for a week and do nothing but crafts ... like this one which I saw in whip up.

I'm thinking of copying the way the smaller frame is slanted but adding other stuff into it ... like lil colorful buttons for baby frames ... lil hearts for lovers frame ... flower stuff for girls .. .and caps for boys.

What ya think? Good idea?